- Home
- Azure
- Apps on Azure Blog
- Azure App Service Authentication: Using MSI or Service Principal to Call Another App Service
- Subscribe to RSS Feed
- Mark as New
- Mark as Read
- Bookmark
- Subscribe
- Printer Friendly Page
- Report Inappropriate Content
Have you ever wondered how to securely access another Azure App Service from your app service without exposing any credentials or secrets? If so, you might be interested in using Managed Identities (MSI) or Service Principals to authenticate and authorize your app service to another app service that is protected by Azure Active Directory (AAD) using built-in authentication (Easy-Auth).
In this article, I will show you how to use MSI or Service Principal of app1 to access app2, which is a custom resource that requires AAD authentication.
Normally, we would use the MSI-validator tool to test the functionality of MSI. However, it only supports specific resources and requires a pre-defined resource value. Currently, it can only use the following resources: default, keyvault, storage, and sql. Since our target resource is a custom resource that is not supported by the MSI-validator tool, we need to use a different method to get the access token for it.
Step1: Enable MSI for my Azure App Service 1 via Azure portal.
Step2: Enable Authentication for my Azure App Service 2 which will automatically register an AAD application.
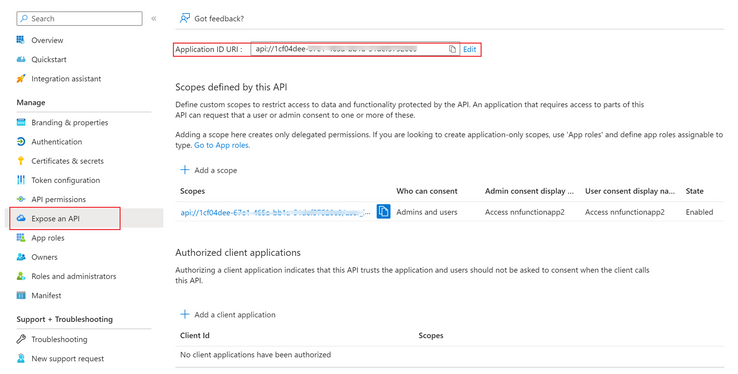
Step3: Then Go to the AAD registered app of Azure App Service 2, copy Application ID URI as the scope.
Step4: Next, I navigate to the Kudu site of Azure App Service 1 by going to Debug console => PowerShell. With the following script. As a result, I successfully obtain the access token using MSI with the requested scope for my Azure App Service 2.
$resourceURI = "api://app-id-of-app2"
$tokenAuthURI = $env:IDENTITY_ENDPOINT + "?resource=$resourceURI&api-version=2019-08-01"
$tokenResponse = Invoke-RestMethod -Method Get -Headers @{"X-IDENTITY-HEADER"="$env:IDENTITY_HEADER"} -Uri $tokenAuthURI
$accessToken = $tokenResponse.access_token
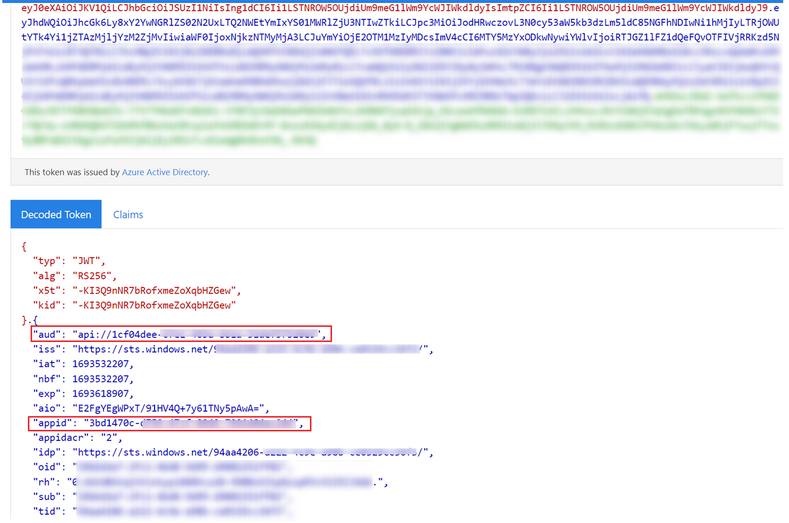
Step5: After successfully obtaining the access token via MSI for my Azure App Service1, I decode it using the website https://jwt.ms/ . Upon decoding, I observe that the 'aud' claim corresponds to the application ID URI of my registered Azure App Service 2. Furthermore, the 'appid' claim represents the application ID of the MSI for my Azure App Service 1. This confirms that the token has been generated by MSI to access the resources of Azure App Service 2.
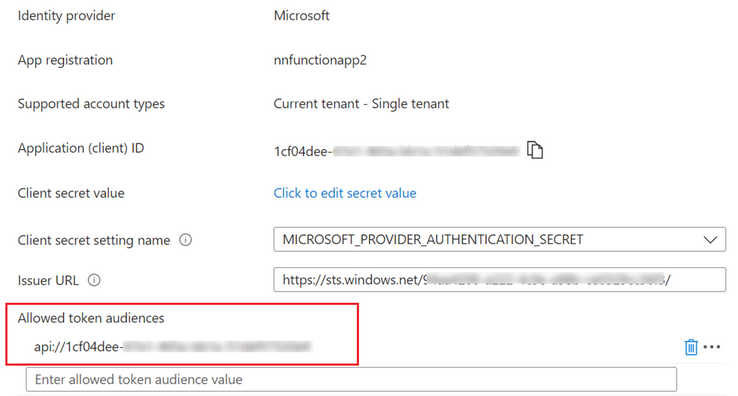
Step6: Next, I access the built-in Authentication(EasyAuth) settings of my Azure App Service 2. I ensure that the 'Allowed token audiences' field is configured with the application ID URI of my Azure App Service 2.
Step7: Using the website https://resources.azure.com/ , I navigate to function app2 => config => authsettingsV2. In the 'allowedApplications' section, I include the application ID of my MSI for Azure App Service 1. This step is important, if not it will result in access being rejected by Azure App Service 2 by error 403 . For more detailed information about this setting, please refer to the documentation: https://learn.microsoft.com/en-us/azure/app-service/configure-authentication-provider-aad?tabs=workf...
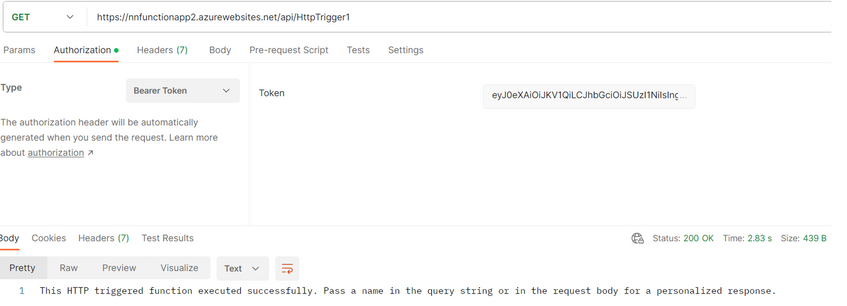
Step8: At this point, I can successfully call my Azure App Service 2 by sending a GET request and including the access token as a bearer token in the request.
I hope this simple POC will be helpful!
You must be a registered user to add a comment. If you've already registered, sign in. Otherwise, register and sign in.


