- Home
- Azure
- Apps on Azure Blog
- Azure Container Apps Announces New Pricing Plan and Enhanced Networking
- Subscribe to RSS Feed
- Mark as New
- Mark as Read
- Bookmark
- Subscribe
- Printer Friendly Page
- Report Inappropriate Content
Today, Microsoft announced the public preview of a new plan and pricing structure for Azure Container Apps (ACA). This structure is designed to adapt compute options to individual apps and microservices components for more flexible microservices solutions. Azure Container Apps now supports a Dedicated plan in addition to the existing serverless Consumption plan.
The Dedicated plan guarantees single tenancy and specialized compute options including memory-optimized choices. In addition, the new Dedicated plan runs in the same Azure Container Apps environment as the serverless Consumption plan. This allows apps or microservice components that may have different resource requirements depending on component purpose or development stack to run in the same Azure Container Apps environment. An Azure Container Apps environment provides an execution, isolation, and observability boundary that allows apps within it to easily call other apps in the environment, as well as provide a single place to view logs from all apps.
When using the new Consumption and Dedicated plan structure, today’s announcement includes optimized network architecture and security features that offer the following:
- Reduced subnet size requirements with a new /27 minimum.
- Support for Azure Container Apps environments on subnets with locked down network security groups and user defined routes (UDR).
- Support for Azure Container Apps environments on subnets configured with Azure Firewall or third-party network appliances.
Compute options are represented as workload profiles defined at the Azure Container Apps environment scope. The default workload profile for each environment is a serverless, general purpose profile available as part of the Consumption plan. Being serverless, you don’t have to worry about the underlying hardware. You’re only billed for the resources your app uses, and your apps can scale to zero eliminating costs. Apps in this profile can use up to 4 vCPU’s and 8GiB’s of memory.
You can also choose to add workload profiles in the Dedicated plan for general purpose or specialized compute requirements. This plan offers up to 16 vCPU’s and 128GiB’s of memory that can be used by a single app, or multiple apps within a workload profile. Dedicated workload profiles can scale in and out as demand requires. If you add more apps to a workload profile or an existing app scales out to more replicas, the workload profile adds more instances to meet additional demand. As demand goes down, instances are removed. You can designate minimum and maximum instances the workload profile uses, which helps control costs to provide more predictable billing.
Billing for Consumption and Dedicated plans is detailed on the Azure Container Apps pricing page. The default serverless Consumption workload profile, which has the same cost model as the original Consumption plan, bills you only for the resources your app uses. When using Dedicated workload profiles, you are billed for the vCPU and memory resources in each instance of the workload profile. As profiles scale out, additional costs apply for the new instances; as profiles scale in, costs are reduced.
When using Dedicated workload profiles there is a cost for plan management. This cost is the same regardless of how many Dedicated workload profiles you use. If running apps at scale, the Dedicated plan can deliver lower cost relative to the Consumption plan.
Creating an Environment
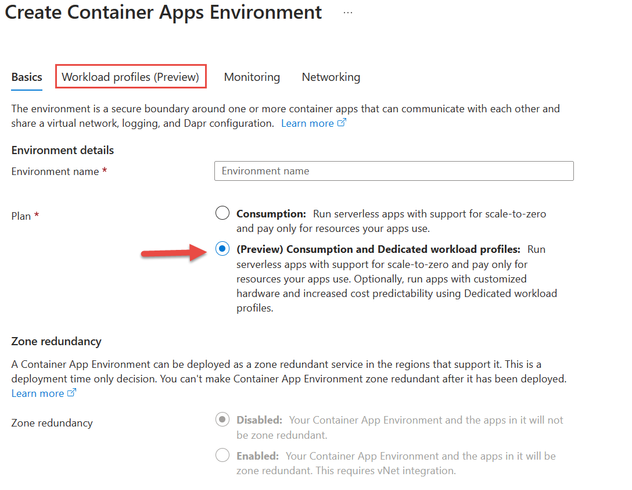
In the Azure portal when you create a new Azure Container app you have the option to create a new environment. In the following screenshot when creating a new environment, you have the option to use the Consumption plan or the Consumption and Dedicated workload profile plan structure. If you choose the Consumption and Dedicated plan structure, a new tab appears where you can add Dedicated workload profiles to the environment.
Image 1: Create an environment
Creating an App
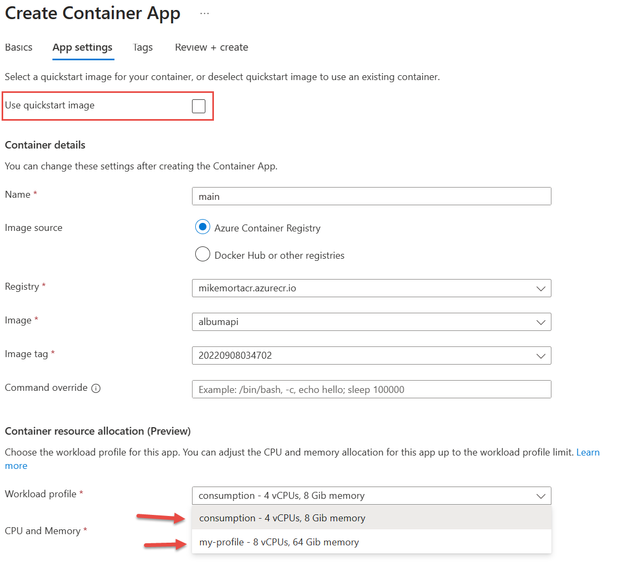
When you create an app in a Consumption + Dedicated environment and you have unchecked the “Use quickstart image” checkbox, you have the option to select a workload profile for the app. This is ideal when you want to deploy a microservice solution where each app can run on the appropriate compute infrastructure.
Image 2: Create an app
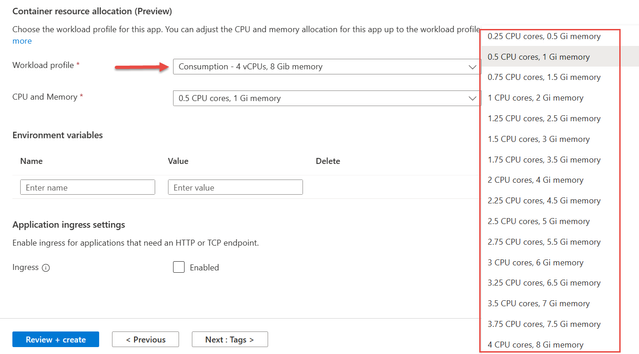
If you select the Consumption workload profile, a dropdown allows you to select one of the allowed combinations of vCPU and memory. You may notice the maximum limits compared to the original consumption plan have doubled.
Image 3: Select app CPU and memory using the Consumption workload profile
When you select the “my-profile” dedicated workload profile which was added to this environment, you will use a pair of sliders to select the number of vCPUs and amount of memory your app needs. You can change these values individually in .1 increments up to the maximum the workload profile supports. More than one app can be placed on the same instance of a workload profile. ACA places the app in a new instance if needed based on the requested vCPU/memory and how many resources are available in the existing instance(s). Instances are added to the workload profile up to the maximum you have configured.
Image 4: Select app CPU and memory using a Dedicated workload profile
Managing Workload Profiles
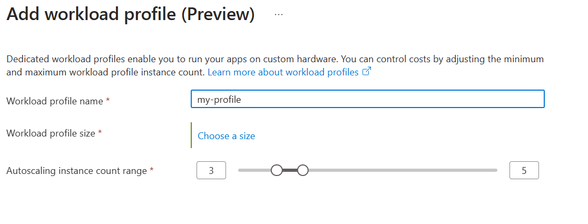
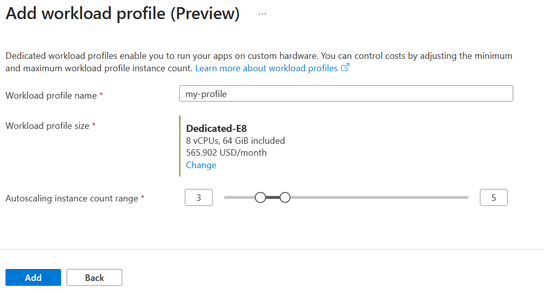
When creating a new Consumption + Dedicated environment, or after it has been created, you can add additional Dedicated workload profiles. When adding a workload profile to the environment you must provide a friendly name, choose a size, and set the min/max instances for scaling of the workload profile. You can’t add additional Consumption workload profiles to an environment, only one is allowed. You can deploy as many apps as needed to the default Consumption workload profile.
Image 5: Add a workload profile to the environment
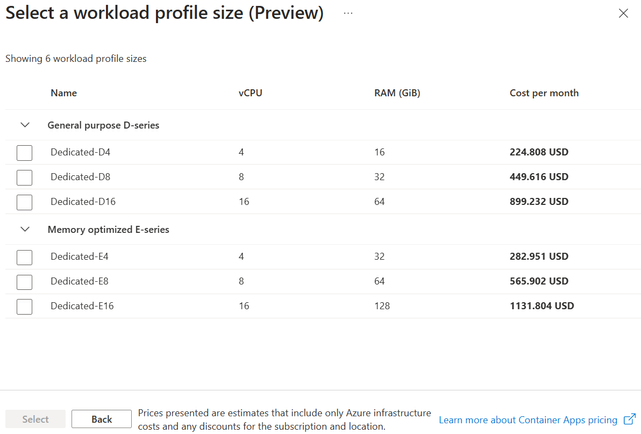
Clicking “Choose a size” on the previous page displays the following page where you must select the type and size of compute for the workload profile. Currently you have two types to choose from, “General Purpose” which has a 1:4 ratio of vCPU-to-memory and “Memory Optimized” which has a 1:8 ratio of vCPU-to-memory and is optimized for memory intensive workloads.
Image 6: Select the type and size of the workload profile
After selecting the workload profile size, the last thing to consider is how you want the workload profile to scale. You can accept the defaults, but you also have the option to change the minimum and/or maximum. If you set the minimum to less than 3 instances, a warning appears to let you know that using less than 3 instances is not recommended for production workloads. This recommendation is based on redundancy best practices in production, but for dev/test environments it is typically acceptable. You can even set the minimum to zero, which means if you have no apps deployed to the workload profile it will scale to zero and lower your costs.
Image 7: Set scaling range of the workload profile
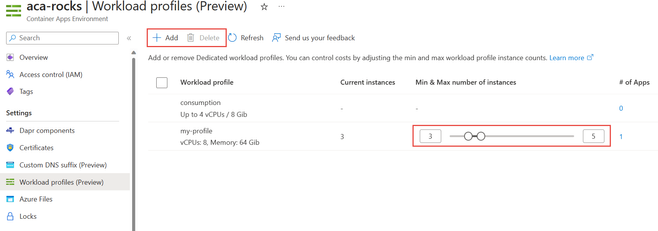
The following screenshot shows the Workload profiles page for the environment. It displays all workload profiles for the environment, both the built-in Consumption and all Dedicated workload profiles. From this page, you can add or delete dedicated workload profiles, change the min/max scale parameters, view the current instance count, and see how many apps are deployed to each workload profile.
Make sure to keep the following in mind:
- You can only delete a workload profile if there are no apps deployed to the profile.
- The current instance count identifies how many instances are allocated and incurring billing costs.
- You can see how many, and by clicking the count, which apps are deployed to the workload profile.
Image 8: Manage the workload profiles in the environment
Smaller subnets
Azure Container Apps virtual network integration depends on a dedicated subnet. The minimum required subnet size on the Consumption + Dedicated plan structure is /27. This size provides more granularity for virtual network address space distribution when using Azure Container Apps compared to the previously required minimum of /23.
When deciding the subnet size in a Consumption + Dedicated environment, keep the following requirements in mind:
- /27 is the minimum subnet size required for virtual network integration.
- The subnet you're integrating your container app with must be delegated to Microsoft.App/environments.
- 11 IP addresses are automatically reserved for integration with the subnet.
- Additional IP addresses are allocated depending on your Container App's workload profile:
- When using Consumption workload profiles for your container app, one IP address is allocated for each replica your container app.
- When using the Dedicated workload profile for your container app, each node is allocated 1 IP address.
For more information on subnet sizing in Azure Container Apps, learn more here.
User Defined Routes (UDR)
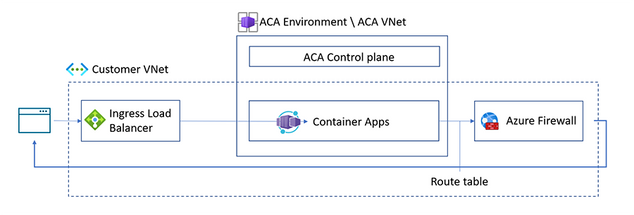
The new Consumption + Dedicated plan structure also supports user defined routes (UDR). With UDR, you can restrict outbound traffic from your container app through Azure Firewall or other network appliances. Configuring UDR is done outside of the Container Apps environment scope.
Image 9: Network diagram using UDR with an ACA environment
Azure creates a default route table for your virtual networks. By implementing a user-defined route table, you can control how traffic is routed within your virtual network. For example, you can create a UDR that routes all outbound traffic to Azure Firewall which provides increased network security and enables network connectivity policies across virtual networks. To route Container Apps traffic to Azure Firewall using UDR, you will need to:
- Create an Azure Firewall and Azure Firewall policy in a separate subnet from your Container App.
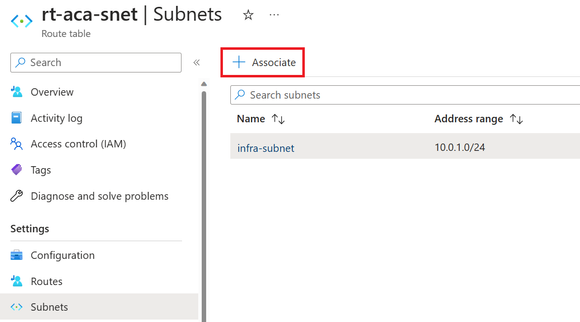
- Create a route table using the Azure Firewall private IP and assign it to the Container Apps subnet.
Image 10: Associate the route table with a subnet
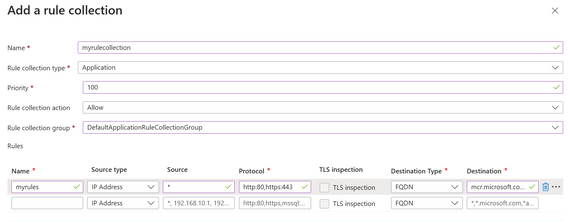
- Add the FQDN mcr.microsoft.com and its dependency *.data.mcr.microsoft.com to the Application rules allow list for your Azure Firewall.
Image 11: Add domains to the allow list of the Azure Firewall
For a detailed guide on how to setup UDR with Container Apps to restrict outbound traffic with Azure Firewall, visit the how to for Container Apps and Azure Firewall.
NAT Gateway Integration
The outbound IP addresses for Container Apps are not static. However, with the Consumption + Dedicated plan structure, you can use a NAT Gateway to simplify outbound connectivity for your outbound internet traffic in your virtual network. NAT Gateway provides a static public IP address, and when you configure NAT Gateway on your Container Apps subnet, all outbound traffic from your container app is routed through the NAT Gateway's static public IP address. Static IPs are particularly useful for Container Apps which need to communicate with third-party services that use allowlists of IP addresses for security.
Conclusion
The new Consumption and Dedicated plan structure allows you to select the best compute option for each of your apps and microservices components for more flexible solutions. The Azure portal provides a rich experience specific to the new plan options. The Azure CLI and ARM/Bicep also support management of the new plan structure. For more information, refer to articles on Microsoft Learn.
To learn more, visit Azure Container Apps | Microsoft Azure today!
The Azure Container Apps team will be discussing these new features on our community live stream on April 13th ,2023 @ 11:00am PDT.
You must be a registered user to add a comment. If you've already registered, sign in. Otherwise, register and sign in.
