- Home
- Azure
- Apps on Azure Blog
- Tutorial:A graceful process to develop and deploy Docker Containers to Azure with Visual Studio Code
- Subscribe to RSS Feed
- Mark as New
- Mark as Read
- Bookmark
- Subscribe
- Printer Friendly Page
- Report Inappropriate Content
Creating and deploying Docker containers to Azure resources manually can be a complicated and time-consuming process. This tutorial outlines a graceful process for developing and deploying a Linux Docker container on your Windows PC, making it easy to deploy to Azure resources.
This tutorial emphasizes using the user interface to complete most of the steps, making the process more reliable and understandable. While there are a few steps that require the use of command lines, the majority of tasks can be completed using the UI. This focus on the UI is what makes the process graceful and user-friendly.
In this tutorial, we will use a Python Flask application as an example, but the steps should be similar for other languages such as Node.js.
Prerequisites:
Before you begin, you'll need to have the following prerequisites set up:
- WSL 2 installation
WSL provides a great way to develop your Linux application on a Windows machine, without worrying about compatibility issues when running in a Linux environment. We recommend installing WSL 2 as it has better support with Docker. To install WSL 2, open PowerShell or Windows Command Prompt in administrator mode, enter below command:
wsl --installAnd then restart your machine.
You'll also need to install the WSL extension in your Visual Studio Code.
- Python 3 installation
Run “wsl” in your command prompt. Then run following commands to install python 3.10 (if you use Python 3.5 or a lower version, you may need to install venv by yourself):
sudo apt-get update
sudo apt-get upgrade
sudo apt install python3.10
- Docker for Linux
You'll need to install Docker in your Linux environment. For Ubuntu, please refer to below official documentation:
https://docs.docker.com/engine/install/ubuntu/
- Docker for Windows
To create an image for your application in WSL, you'll need Docker Desktop for Windows. Download the installer from below Docker website and run the downloaded file to install it.
https://www.docker.com/products/docker-desktop/
Steps for Developing and Deployment
1. Connect Visual Studio Code to WSL
To develop your project in Visual Studio Code in WSL, you need to click the bottom left blue button:
Then select “Connect to WSL” or “Connect to WSL using Distro”:
2. Install some extensions for Visual Studio Code
Below two extensions have to be installed after you connect Visual Studio Code to WSL.
The Docker extension can help you create Dockerfile automatically and highlight the syntax of Dockerfile. Please search and install via Visual Studio Code Extension.
To deploy your container to Azure in Visual Studio Code, you also need to have Azure Tools installed.
3. Create your project folder
Click "Terminal" in menu, and click "New Terminal":
Then you should see a terminal for your WSL.
I use a quick simple Flask application here for example, so I run below command to clone its git project:
git clone https://github.com/Azure-Samples/msdocs-python-flask-webapp-quickstart
4. Python Environment setup (optional)
After you install Python 3 and create project folder. It is recommended to create your own project python environment. It makes your runtime and modules easy to be managed.
To setup your Python Environment in your project, you need to run below commands in the terminal:
cd msdocs-python-flask-webapp-quickstart
python3 -m venv .venv
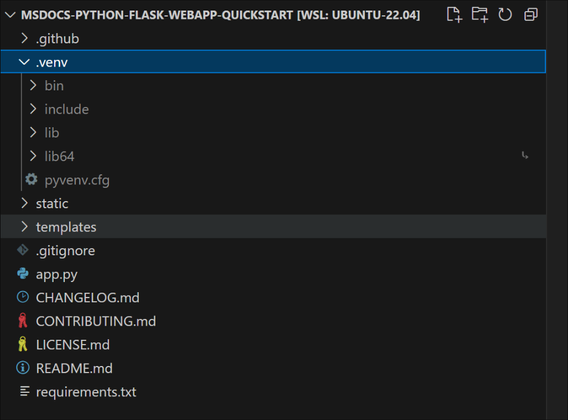
Then after you open the folder, you will be able to see some folders are created in your project:
Then if you open the app.py file, you can see it used the newly created python environment as your python environment:
If you open a new terminal, you also find the prompt shows that you are now in new python environment as well:
Then run below command to install the modules required in the requirement.txt:
pip install -r requirements.txt
5. Generate a Dockerfile for your application
To create a docker image, you need to have a Dockerfile for your application.
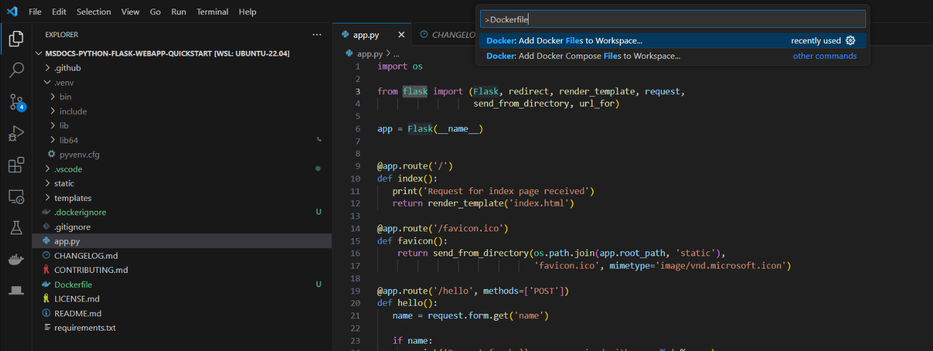
You can use Docker extension to create the Dockerfile for you automatically. To do this, enter ctrl+shift+P and search "Dockerfile" in your Visual Studio Code. Then select “Docker: Add Docker Files to Workspace”
You will be required to select your programming languages and framework(It also supports other language such as node.js, java, node). I select “Python Flask”.
Firstly, you will be asked to select the entry point file. I select app.py for my project.
Secondly, you will be asked the port your application listens on. I select 80.
Finally, you will be asked if Docker Compose file is included. I select no as it is not multi-container.
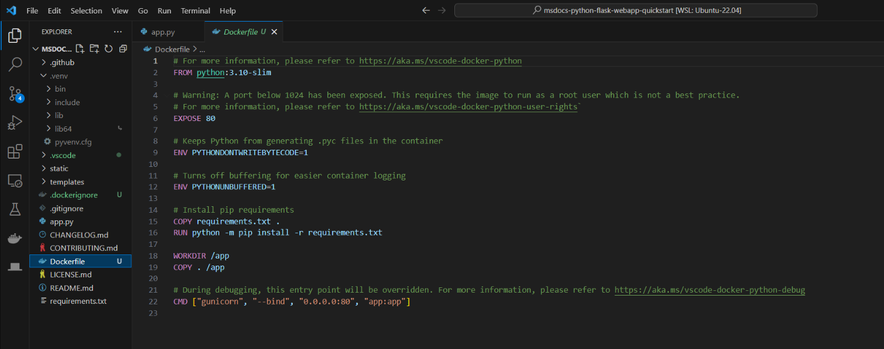
A Dockefile like below is generated:
Note:
If you do not have requirements.txt file in the project, the Docker extension will create one for you. However, it DOES NOT contain all the modules you installed for this project. Therefore, it is recommended to have the requirements.txt file before you create the Dockerfile. You can run below command in the terminal to create the requirements.txt file:
pip freeze > requirements.txt
After the file is generated, please add “gunicorn” in the requirements.txt if there is no "gunicorn" as the Dockerfile use it to launch your application for Flask application.
Please review the Dockerfile it generated and see if there is anything need to modify.
You will also find there is a .dockerignore file is generated too. It contains the file and the folder to be excluded from the image. Please also check it too see if it meets your requirement.
6. Build the Docker Image
You can use the Docker command line to build image. However, you can also right-click anywhere in the Dockefile and select build image to build the image:
Please make sure that you have Docker Desktop running in your Windows.
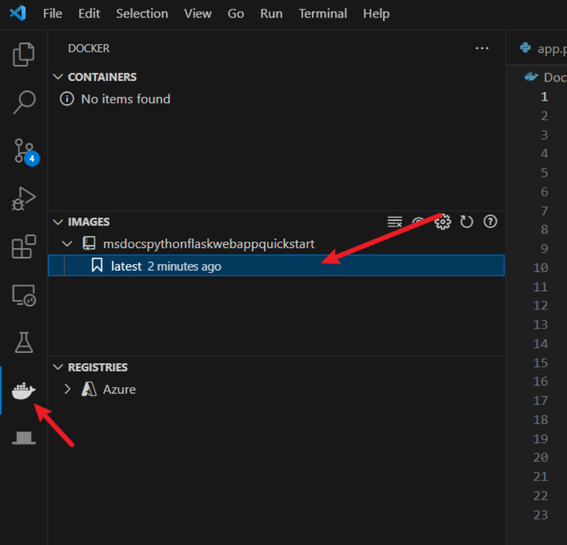
Then you should be able to see the docker image with the name of the project and tag as "latest" in the Docker extension.
7. Push the Image to Azure Container Registry
Click "Run" for the Docker image you created and check if it works as you expected.
Then, you can push it to the Azure Container Registry (ACR). Click "Push" and select "Azure".
You may need to create a new registry if there isn't one. Answer the questions that Visual Studio Code asks you, such as subscription and ACR name, and then push the image to the ACR.
8. Deploy the image to Azure Resources
Follow the instructions in the following documents to deploy the image to the corresponding Azure resource:
Azure App Service or Azure Container App: Deploy a containerized app to Azure (visualstudio.com) Opens in new window or tab
Container Instance: Deploy container image from Azure Container Registry using a service principal - Azure Container Ins...
You must be a registered user to add a comment. If you've already registered, sign in. Otherwise, register and sign in.


