- Home
- Azure
- Apps on Azure Blog
- Step-by-Step Guide: Deploying JupyterLab to Azure App Service with Docker
- Subscribe to RSS Feed
- Mark as New
- Mark as Read
- Bookmark
- Subscribe
- Printer Friendly Page
- Report Inappropriate Content
Introduction
JupyterLab is a web-based interactive development environment for working with data, code, and visualization. Azure App Service is a platform for hosting web applications in the cloud. In this blog post, we will discuss how to deploy JupyterLab to Azure App Service using the official Docker image in Docker Hub.
Deploying JupyterLab to Azure App Service
To deploy JupyterLab to Azure App Service, we will use the Docker image jupyter/scipy-notebook hosted in Docker Hub, which contains JupyterLab and all its dependencies.
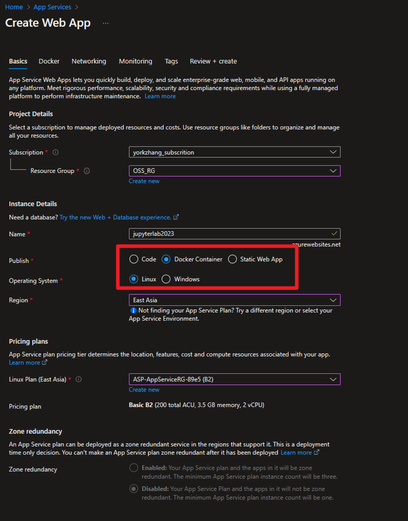
1. First, create an Azure App Service. To do this, go to the Azure portal, select "App Services," and click "Add" to create an app service. Make sure to select "Docker Container" as the publish option and "Linux" as the operating system.
2. Click “Next: Docker” and select "Docker Hub" as the image source. For the image and tag, specify "jupyter/scipy-notebook:latest".
3. Click the "Review and create" button to review the settings, and then click the "Create" button.
Configuring the App Service
After creating the App Service, we need to configure it to view the application token and mount the file share.
1. Enable logs for Azure App Service by following these steps:
- Go to the Azure portal and select your App Service.
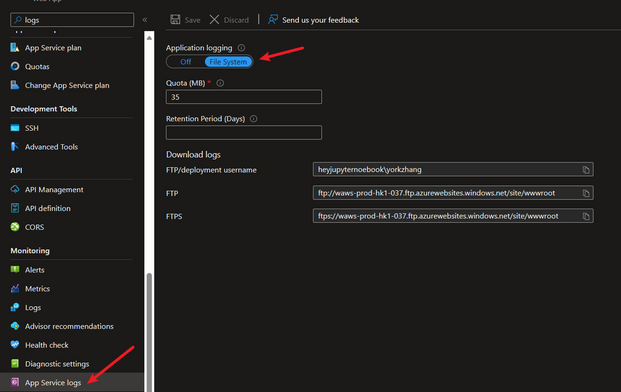
- Select "App Service logs" under the Monitoring section.
- Toggle "Application Logging (Filesystem)" to "On" and specify the desired log level.
- Click "Save" to save your changes.
2. To persist the Jupyter notebooks you create in the JupyterLab, you need to mount a file share. To mount a file share, follow these steps:
- Select the "Configuration" blade.
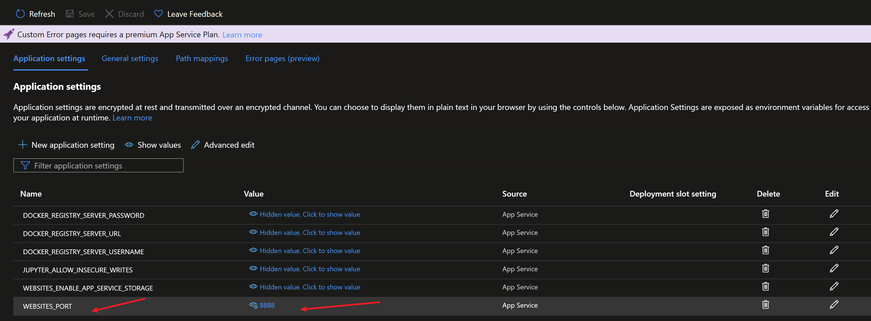
- In the Application Settings tab, click "New application setting" and add application setting WEBSITES_PORT with value 8888.
- Under the "Path mappings" tab, click "+ Add new path mapping".
- Enter the storage mount name and select the Configuration Options as Basic. Enter your Storage account, select storage type as “Azure Files” and select your storage container. If you do not have an “Azure Files” in storage account, please refer to this document to create one.
- Enter the mount path “/home/jovyan” and the file share URL.
Click "Save" to save your changes.
Starting JupyterLab in App Service
After restarting the App Service, browse the app service site. However, you should see JupyterLab asking for a token to enter.
To find the token, go to the “Log Stream” in the left blade and you should find it hidden there:
A trap!
Your App Service may fail to start, and you may find the following error in the log stream:
RuntimeError: Permissions assignment failed for secure file: '/home/jovyan/.local/share/jupyter/runtime/jpserver-6.json'. Got '0o677' instead of '0o0600'.
This issue occurs because Jupyter checks the permission of the jpserver-6.json file. If it fails to meet the permission requirement, it will throw an error. For more information, please check this document.
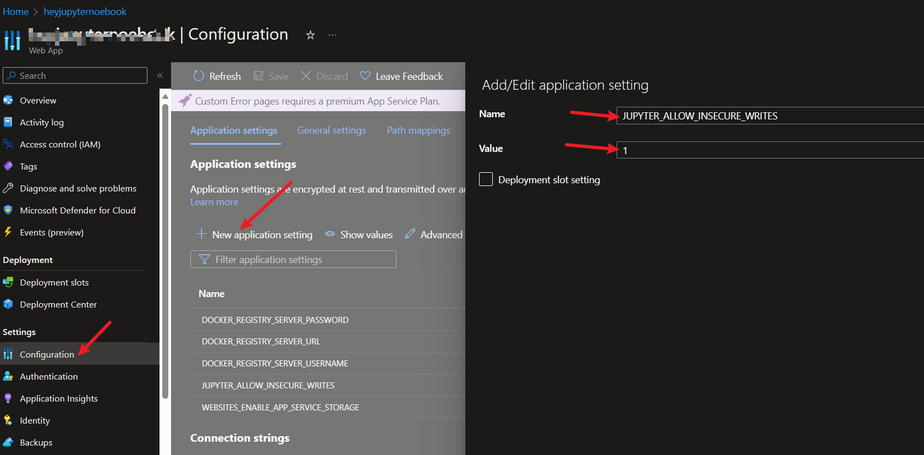
To workaround this, add an application setting JUPYTER_ALLOW_INSECURE_WRITES in the App Service and give it a value of 1.
Enjoy playing with JupyterLab in Azure App Service!
You must be a registered user to add a comment. If you've already registered, sign in. Otherwise, register and sign in.


