- Home
- Azure
- Apps on Azure Blog
- Seamless Integration: Enhancing your Static Web App by adding an Azure Functions backed AI Chatbot
- Subscribe to RSS Feed
- Mark as New
- Mark as Read
- Bookmark
- Subscribe
- Printer Friendly Page
- Report Inappropriate Content
Introduction
Prerequisites
- .NET 6.0 or greater (Download here: Download .NET 6.0)
- Node.js installed on your machine
- An Azure Account
- Azure OpenAI resource or an OpenAI account (If you are using Azure OpenAI follow these steps: Create and deploy an Azure OpenAI Service resource)
- Azure Storage emulator (e.g., Azurite setup guide here: Use the Azurite emulator for local Azure Storage development)
Step-by-Step Guide
Deploy an Azure Function App with OpenAI Extension
Getting Started
1. Clone the Extension and Sample Repository: Start by cloning the repository from https://github.com/Azure/azure-functions-openai-extension/. To better understand how this integration works I also recommend reading the docs regarding the general requirements as well as the chatbot sample specific instructions.
2. Navigate to the Sample Chatbot Project: Once cloned, navigate to the sample chatbot project located at samples/chat/nodejs. We will use this sample project to deploy to our Azure Function App and expose our chatbot endpoints that will later on be consumed by our Static Web App.
3. Configure Environment Variables for testing: To connect to your OpenAI resource locally during testing, configure the required environment variables in the samples/chat/nodejs/local.settings.json file. Depending on your setup, use one of the following templates:
- For Azure OpenAI resource you will have to add CHAT_MODEL_DEPLOYMENT_NAME, AZURE_OPENAI_KEY and AZURE_OPENAI_ENDPOINT:
{
  "IsEncrypted": false,
  "Values": {
    "AzureWebJobsStorage": "UseDevelopmentStorage=true",
    "AzureWebJobsFeatureFlags": "EnableWorkerIndexing",
    "FUNCTIONS_WORKER_RUNTIME": "node",
    "CHAT_MODEL_DEPLOYMENT_NAME":  "<your-deployment_name>",
    "AZURE_OPENAI_KEY": "<your_key_here>",
    "AZURE_OPENAI_ENDPOINT": "https://<your-openai-endpoint>.openai.azure.com/"
  }
}- Or, for direct OpenAI API access you will have to add OPENAI_KEY. You can also override the CHAT_MODEL_DEPLOYMENT_NAME if needed:
{
  "IsEncrypted": false,
  "Values": {
    "AzureWebJobsStorage": "UseDevelopmentStorage=true",
    "AzureWebJobsFeatureFlags": "EnableWorkerIndexing",
    "FUNCTIONS_WORKER_RUNTIME": "node",
    "CHAT_MODEL_DEPLOYMENT_NAME":  "gpt-3.5-turbo"
    "OPENAI_KEY": "<your_openai_key_here>"
  }
}
4. Start the Application Locally: Test your chatbot by running it locally. Use the following commands:
azurite --silent --location c:\azurite --debug c:\azurite\debug.log --blobPort 8888 --queuePort 9999 --tablePort 11111

npm install && dotnet build --output bin && npm run build && npm run start
- Create a chat session:
PUT http://localhost:7071/api/chats/TailoredTales

{
    "instructions": "You are TailoredTales, a guide in the quest for the perfect read. Respond with brief, engaging hints, leading seekers to books that fit as if destined, blending curiosity with the promise of a great discovery."
}
- To send messages to the bot, execute the following request:
POST http://localhost:7071/api/chats/TailoredTales

What's a captivating book that blends mystery with a touch of magic, ideal for someone who loves both genres and is looking for a new book?- To list all questions with answers for later use in populating your chatbot window, execute the following:
GET http://localhost:7071/api/chats/TailoredTales?timestampUTC=2023-11-9T22:00Deploy to an Azure Function App
samples/chat/src/functions/app.ts from function to anonymous.Cognitive Services OpenAI User role on the Azure OpenAI resource.Develop and deploy the front end to Azure Static Web Apps
Let's create a new React app
1. Set Up the Project: Create a new project for your front-end app. Initialize it with the chosen framework or tools. For this demo we will be using React.js. We will also install axios to make HTTP requests to interact with our chatbot backend. Feel free to use any other technology you are comfortable with.
npx create-react-app chatbot-app

cd chatbot-app

npm install axios- It can create a new chat session by calling the
createChatAPI. - It can post messages to an existing chat session using the
postMessageAPI. - It can retrieve the state of a chat session at a specific timestamp using the
getChatStateAPI. - The
<function-hostname>in the BASE_URL is only required for local testing. As soon as we have linked the deployed Static Web App to our Function App the integration will fully handle routing and authentication for us and we can simple make calls to the Static Web Apps hostname by changing the BASE_URL to/api/chats. For now replace the value with either the local host running the chatbot app or your functions hostname (In that case you will have to also configure CORS on the function app).
import axios from 'axios';

const BASE_URL = '<function-hostname>/api/chats/';

export const createChat = async (chatId, instructions) => {
  try {
    const response = await axios.put(`${BASE_URL}${chatId}`, {
      instructions,
    });
    return response.data;
  } catch (error) {
    console.error("Error creating chat:", error);
    throw error;
  }
};

export const postMessage = async (chatId, message) => {
  try {
    await axios.post(`${BASE_URL}${chatId}`, message, {
      headers: {
        'Content-Type': 'text/plain',
      },
    });
  } catch (error) {
    console.error("Error posting message:", error);
    throw error;
  }
};

export const getChatState = async (chatId, timestampUTC) => {
  try {
    const response = await axios.get(`${BASE_URL}${chatId}`, {
      params: { timestampUTC },
    });
    return response.data;
  } catch (error) {
    console.error("Error getting chat state:", error);
    throw error;
  }
};
3. Creating the Chat Box Component: We are creating a component responsible for creating a chat interface and handling chat interactions with a chatbot backend. Here's a summary of its functionality:
- State Management: It uses React state hooks to manage the following state variables:
chatId: Stores the unique identifier for the chat session.message: Stores the user's input message.messages: Stores the chat messages exchanged between the user and the chatbot.lastUpdate: Keeps track of the timestamp of the last chat message update.
- Initialization: When the component mounts, it initializes a chat session by calling the
createChatfunction from theChatServiceand sets thechatId. - Polling for Messages: It sets up a polling mechanism (
pollForMessages) to check for new chatbot responses at regular intervals. When new responses are received, they are added to themessagesstate. - Message Submission: When the user submits a message, it adds the user's message to the chat interface, calls the
postMessagefunction to send the message to the chatbot backend, and triggers the polling for new chatbot responses. - Scrolling: It ensures that the chat interface automatically scrolls to display the latest messages at the bottom.
- Rendered Elements: It renders a chat interface with the chat messages and an input field for users to type their messages.
- Conditional Rendering: Messages from the chatbot are displayed with an "Assistant" label.
import React, { useState, useEffect, useRef } from 'react';
import { createChat, postMessage, getChatState } from './ChatService';
import './ChatBox.css';

const ChatBox = () => {
  const [chatId, setChatId] = useState('');
  const [message, setMessage] = useState('');
  const [messages, setMessages] = useState([]);
  const [lastUpdate, setLastUpdate] = useState(new Date().toISOString());

  const messagesEndRef = useRef(null);

  useEffect(() => {
    const initChat = async () => {
      const chatSessionId = `chat_${new Date().getTime()}`;
      const instructions = "You are TailoredTales, a guide in the quest for the perfect read. Respond with brief, engaging hints, leading seekers to books that fit as if destined, blending curiosity with the promise of a great discovery.";
      setChatId(chatSessionId);
      await createChat(chatSessionId, instructions);
    };

    initChat();
  }, []);

  const pollForMessages = async () => {
    const maxPollingDuration = 10000;
    const pollingInterval = 200;
    let totalPollingTime = 0;

    const poll = setInterval(() => {
      getChatState(chatId, lastUpdate).then(data => {
        if (data !== null) {
          const assistantMessages = data.RecentMessages.filter(msg => msg.Role === 'assistant');
          if (assistantMessages.length > 0) {
            setMessages(prevMessages => [...prevMessages, ...assistantMessages]);
            setLastUpdate(new Date().toISOString());
            clearInterval(poll);
          }
        }
      });

      totalPollingTime += pollingInterval;
      if (totalPollingTime >= maxPollingDuration) {
        clearInterval(poll);
      }
    }, pollingInterval);
  };

  const handleSubmit = async (e) => {
    e.preventDefault();
    if (message) {
      const tempMessage = {
        Content: message,
        Role: 'user',
        id: new Date().getTime(),
      };
      setMessages(prevMessages => [...prevMessages, tempMessage]);
      await postMessage(chatId, message);
      setMessage('');
      pollForMessages();
    }
  };

  useEffect(() => {
    const messagesContainer = messagesEndRef.current;
    if (messagesContainer) {
      messagesContainer.scrollTop = messagesContainer.scrollHeight;
    }
  }, [messages]);

  return (
    <div className="chatbox-container">
      <div className="chatbox-header">
        Tailored Tales
      </div>
      <div className="chatbox-messages" ref={messagesEndRef}>
        {messages.map((msg, index) => (
          <div key={index} className={`message ${msg.Role}`}>
            {msg.Role === 'assistant' && <div className="message-role">Assistant</div>}
            <span>{msg.Content}</span>
          </div>
        ))}
      </div>
      <form onSubmit={handleSubmit} className="chatbox-form">
        <input
          type="text"
          value={message}
          onChange={(e) => setMessage(e.target.value)}
          placeholder="Type here..."
          className="chatbox-input"
        />
      </form>
    </div>
  );
};

export default ChatBox;import React from 'react';
import ChatBox from './ChatBox';
function App() {
return (
<div className="App">
<ChatBox />
</div>
);
}
export default App;
@import url('https://fonts.googleapis.com/css2?family=Inter:wght@400;500;600&display=swap');
* {
  font-family: 'Inter', sans-serif;
}

@import url('https://fonts.googleapis.com/css2?family=Inter:wght@400;500;600&display=swap');

.chatbox-container {
  position: fixed;
  bottom: 10px;
  right: 10px;
  width: 320px;
  height: 600px;
  display: flex;
  flex-direction: column;
  justify-content: space-between;
  background-color: #fff;
  border-radius: 16px;
  box-shadow: rgba(9, 30, 66, 0.25) 0px 1px 1px, rgba(9, 30, 66, 0.13) 0px 0px 1px 1px;
  font-family: 'Inter', sans-serif;
  padding-top: 0;
}

.chatbox-header {
  padding: 12px 20px;
  border-top-left-radius: 8px;
  border-top-right-radius: 8px;
  font-size: 1.2em;
  box-shadow: 0 2px 2px rgba(0, 0, 0, 0.05);
  text-align: left;
  font-weight: 900;
}

.chatbox-messages {
  flex-grow: 1;
  padding: 15px;
  overflow-y: auto;
  display: flex;
  flex-direction: column;
  gap: 10px;
  overflow-y: auto;
  margin-top: 0;
  scrollbar-width: none;
}

.message {
  max-width: 75%;
  word-wrap: break-word;
  padding: 10px 14px;
  border-radius: 18px;
  line-height: 1.4;
  position: relative;
  margin-bottom: 4px;
}

.message.user {
  align-self: flex-end;
  background-color: #5851ff;
  color: #fff;
  border-bottom-right-radius: 4px;
}

.message.assistant {
  align-self: flex-start;
  background-color: #efefef;
  color: #333;
  border-bottom-left-radius: 4px;
}

.chatbox-form {
  display: flex;
  padding: 10px 15px;
  background-color: #ffffff;
  box-shadow: 0 -2px 2px rgba(0, 0, 0, 0.1);
  border-bottom-left-radius: 16px;
  border-bottom-right-radius: 16px;
}

.chatbox-input {
  flex-grow: 1;
  margin-right: 8px;
  padding: 10px;
  border: 0px solid #d1d1d4;
  border-radius: 18px;
  background-color: #ffffff;
  outline: none;
}

.message-role {
  font-size: 0.7rem;
  color: #6c757d;
  margin-bottom: 2px;
}
Deploy Your React App to Azure Static Web Apps
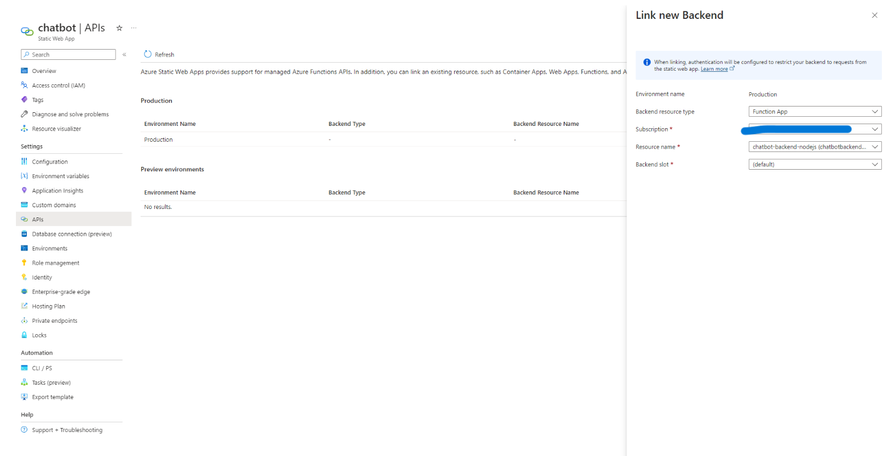
Link your Function App to your Static Web Apps

You are all done! 🥳
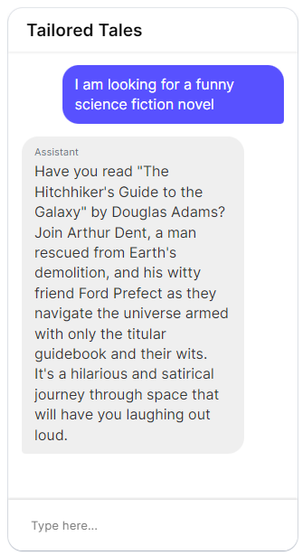
You can now go to your static web app and start asking your Tailored Tales bot anything about books.

Links
- Final React Project: https://github.com/annikel/chatbot-app
Annina Keller is a software engineer on the Azure Static Web Apps team. (Twitter: @anninake)
You must be a registered user to add a comment. If you've already registered, sign in. Otherwise, register and sign in.